Monday, August 9, 2010

A Week In "The Cottage Life" ~ Part One


Since I was about 7 years old, it was always my dream to live on Cape Cod and have a business where I could create a little shop offering "sentimental enchantments", (being lovely treasures from yesteryear), unique smalls/ accents (usually something made from something else), and have a place to display and sell what has now become, "Pieces of Dreams" hand painted, chic-tique furniture. All these years later, I'm here, on the Cape, and doing just that.

Although I am very thankful, it's not as easy or glamorous as it looks. Of course, anyone who does something similar knows the lugging, sanding, priming, painting and time involved. I, for one, am usually a complete mess (nice fingernails...what are they?), while all the vacationers are on the beach or getting dressed up to go out to eat and shop. I find the book work to be very tedious and spend long hours during the day being "on", to keep the dynamics of my shop visitors positive and pleasant. I have to constantly worry about getting the right inventory and keep the shop full and looking nice. Since, I don't order my offerings out of a catalogue, I have to hunt it or create it...And here, within these words, we've come full circle...hunting, creating, displaying, decorating, etc....(happy sigh!) I'm doing what I've dreamed of doing!

So, here's part one of "The Cottage Life" ~


Here, we find the back bedroom formerly closed last year to the public. We needed it for storage and eventually, the overflow of moving out of the Chatham location. It's really important to have this open for keeping the shopping flow interesting, so as to capture the attention of my visitors. Along with finishing up with some trim painting, I had to get going with my backlog of "wanna-be's". Pictured are some recent inventory projects that are in the brown, ready-to-be-sanded form, as well as some pieces that have been sanded and primed.


These two pieces have already been painted (the yellow one has been striped and taped off for more detail). I had this blue piece in the Chatham house and didn't feel it was necessary to repaint the whole thing all over again, so I gave it a quick sprucing up of dry brushing on the legs, and here it waits for some stripes and artwork.


So, for the past week while no people are in the shop, I've been busy painting the room and base coating some of the primed pieces.


I've picked up some nice bedding at a tag sale and am trying to re-create the pink and green theme in the bedroom I had before. The dresser was done previously, but the matching nightstand, with the drawers and body done opposite of what is on the dresser, was sold. I found this cute little piece and thought it would do the trick as a replacement.


It's painted and shabbied off in this place and that. You can really see how charming the piece is, now that it is no longer brown and scratched...Shabbied, Yes! Scratched, No!


And, here is a table I had that used to be a shade of yellow. When I shabbied this one off, some of the yellow paint and white from the primer show along the "shabby line". I love pink and yellow!


Although it's not quite a bedroom yet, the room is open and sales have improved! Perhaps this week, I can get the bed I painted in here. In the meanwhile, I have placed furniture and wicker around so that it is presentable enough to be open. Now comes the fun of filling it and keeping it that way!


Before I could get all the pictures taken, I sold the Victorian what-not that I had in this corner, so I had to do something make-shift with the chair.
It's the beginning of a whole new week. Let's see what can be accomplished for "part two"!


Wishes of peace and happiness to all,
Pieces of Dreams

Sunday, August 1, 2010

With A Little Paint and Magic Brush, We Have the Solution to the Decorating Problem!


"Summer Time....And the living ain't easy! But, that's how it is when you own a business on Cape Cod within the height of the season. (And, we are thankful for that!) Streams of sunny people visit us at our shops. Some shop friends are new and some are people who care enough to come back year after year, to shop and catch up on "what's new". All in all, it's a "good tired" when we reach the end of the day.


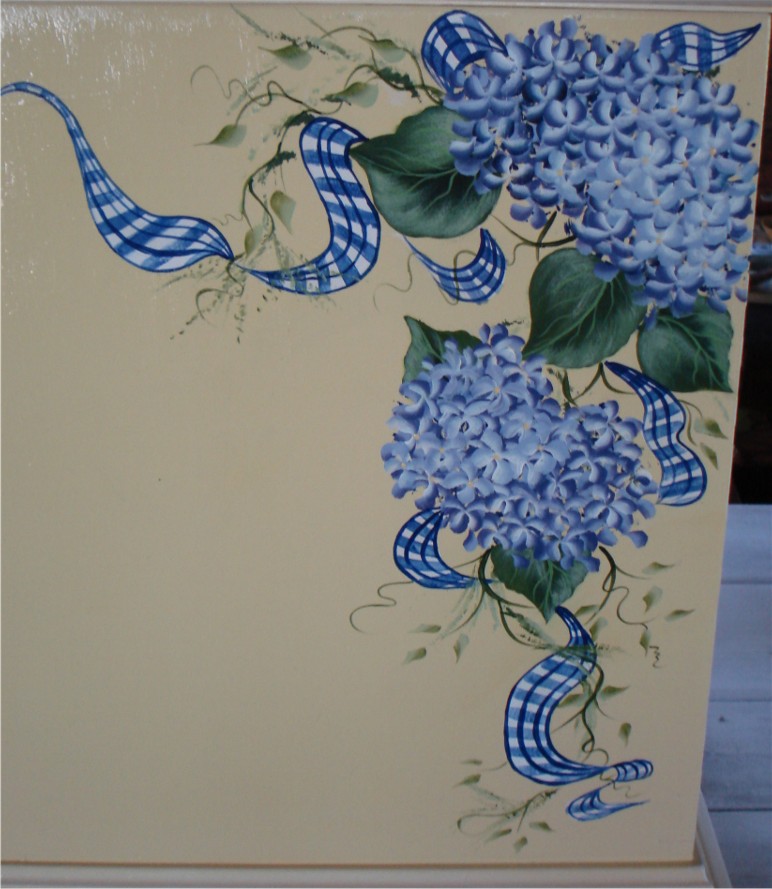
Along with running the shop, I've been working on a custom order for someone with a home in....you guessed it....Chatham. She had a pine blanket chest, previously finished in a dark brown stain with a picture of the Chatham band stand painted on it, along with "Chatham, 1712". Since her room is done in yellow, blue and white, with a hydrangea theme, the dated dark brown just wasn't getting the decorating job done.


Below are pictures of the solution! (Remember to double-click on the pics!)


I apologize for being so bad at not starting my photos at the very beginning. Here we have the piece, which has already been sanded, primed, base coated in the chosen yellow, and striped. As you can see, I am starting to lay out my design with my trusty fan brush and sponge.


My client wanted the a free-form design.


She also wanted the Chatham band stand put back the way it was, along with the lettering. I was lucky enough to find a stencil the exact font and size that was previously on the trunk (probably, because the first decorative artist used the same one). The first band stand design was also free handed, but did not have the flowers and surrounding grasses.


So, here we have the basic design lay out and now we are ready to have some fun!


The above shows the lay out of the ribbon (which, when complete, will match the reverse side fabric of her comforter and window treatments). I've also hand painted the large leaves and added the shading and high light detail.


Here, I've added the vining and shadow leaves, along with the detailing on the ribbon and first of three layers for the hydrangea petals.


Close up of finished design.


More details within a flowing ribbon.


Signed, sealed, but not yet delivered. (Still in the barn workshop.)


I have another project due for the same client. When I deliver that one, her guests will be gone and she says I can take pictures of the pieces I have done for her on site.

Until then, it's back to visiting with shop customers and covering myself with paint, as I work on projects for reopening the back room of my shop.


I wish all of you out there in blog land and wonderful, wonderful week!


Pieces Of Dreams

Tuesday, July 27, 2010

Cushy Creations (Sewing Tutorial)


I love to save money by creating a treasure out of something I already have!


When hosting our recent party, we found ourselves without proper outdoor furniture. In order to solve this problem, we immediately hit the yard/estate sales and hunted down the tables and chairs needed to get the job done (see previous posts). However, they were lacking cushions for the seats.


In my business, Karen's Garden Cottage Antiques, I specialize in creating "Pieces of Dreams" hand painted furniture, "chic-tiqued" vintage pieces, and refurbished vintage wicker. Therefore, I am always coming across cushions and pillows that are clean, but in need of a face lift. Since I don't want to display my creations with forlorn seats, I find myself doing a lot of recovering to get the look I am trying to achieve. This time, I needed some cushions for our own furniture. And lucky for me, I had a large selection of cushions to choose from, along with beautiful bolts of coordinating fabric purchased at yard sales for 5 and 10 dollars each. (Especially the red and white-checky plaid!)


Below is a step-by-step of what I did and how I did it! (You can double click on my photos to get a better view)


As you can see, I have a cushion that needs recovering. I made a pattern out of some old wrapping paper that I had handy. I placed the cushion onto the paper and traced around it, being sure to leave about 3/4 ths of an inch around to allow for the puffiness of the cushion, as well as the seam allowance. After I traced the pattern and cut it out, I folded the pattern piece in half and trimmed the pattern piece so that both sides would be even.


What you will need is one top piece and two pieces for the reverse side of the cushion. Please notice that when the two reverse side pieces are put together, they are larger in length than the top piece. I have allowed about 2 1/2 inches on each piece so that when they are put together, they overlap to form the pocket for putting the cushion into the cover. (You can see the overlap shown in the picture above.) I've carefully pinned the pattern pieces to the fabric and cut it out. (When I did this, I was working with the check/plaid material and lined up my pattern pieces on the fabric so that when sewn together, the fabric patterns would match up.)


Here is what one of the bottom pieces looks like. I am going to iron each bottom piece and prepare it for being sewn to the top cushion piece. (Once again, I have added 2 1/2 inches to the straight edge on the top of each of the bottom pieces.)


Because I want to get all my cutting and prep work done, I am hopping over to the ruffle preparation (if you choose to add one). The size of the ruffle is up to you. What I wanted was about a 2 inch ruffle, so I cut strips of material 4 1/4 inches wide. The length of the strip measures double for the area you to add the ruffle to. Here, I needed to put two strips together. ALWAYS IRON YOUR SEAMS OPEN!


After I put the two pieces together and ironed the seam, I have folded the ruffle strip in half and ironed it. My strip is done and ready for ruffling!


I am back to the two reverse side pieces and I am turning the top edge under 1/4th inch once, ironing it, turning it under once again, and ironing it again.


I've chosen to use the zig-zag stitch to make a nice clean edge to the top of my two reverse side pieces.


The ruffle and reverse side pieces are prepped and ready to go!


I am at the machine and have it set on regular straight stitching. I fold and stitch as I go, creating "finger pleats" (I really like the look and process of this type of ruffling). If you have a ruffler on your machine, you may prefer that.


For this project, I am not ruffling all the way around the piece. I have marked off the area I want to add the ruffle to and am now pinning the ruffle onto the right side of the top piece of the cushion. Notice that the ruffle is facing IN. That is so when the whole thing is sewn together (right sides together) and turned right side out, the ruffle sticks out the proper way.


This is a close up of the completed pinning down of the ruffle.


The pinning of the finger pleating is complete and with right sides together, the piece is ready to be pinned together and sewn.


Once again, right sides together, with the two reverse side pieces overlapping, it's all pinned together and ready to be sewn!


I've sewn it together, turned it right side out and ironed it. It is done and ready for the cushion to be inserted into its new cover! Notice how the pocket pieces on the reverse side of the cushion overlap and the pattern matches up.


Peek-A-Boo! It's all put together and neatly covered with something fresh and new. I've gotten the custom look I want, using things I already have, and fabric I got for a song! What could be better than that?


So, not only did I make all the cushions for the outdoor furniture (you can see it all in my previous two posts), I also mixed and matched other coordinating fabric (Country Fair Check by Waverly) and made pillows and other cushion covers. I had a lot of that checky-plaid and sewed and sewed...


...and sewed!!!!


We have a country sun porch in the old family farm house. Since there was fabric to spare, I made two styles of lined valances.


And, now that I have completed these projects and have gotten everything ready for summer and family visitors, I am back to work and painting. I will share some of those projects next!


Pieces of Dreams


Tuesday, July 13, 2010

Table Setting Logic...Think: Who, What, When, Where and Why!


In early March, we received a rash of e-mails proposing the idea of a family reunion/birthday party for my now 87 year old mother-in-law (to be). We had, and still have, a great deal going on in our family this year...Babies have been born, family members are retiring and joining us as residents of Cape Cod, distantly located family hadn't seen loved ones in a while and, sadly, Wayne's 87 year old mother is battling tongue cancer. So, we decided to come together at the two houses on the Cape (the family farm house and a nearby, newly built house) to celebrate life and rally our healing powers and prayers.

I was cooking and freezing ahead for weeks because approximately 30 (give or take) people were coming to spend quality time together. In addition, Wayne and I are in "The Season" and shops don't run themselves. Food preparation aside, we also faced challenges with making changes in the house, so that we would be able to accommodate our guests for the party, and for future, expected summer visitors, in a somewhat organized and comfortable manner.

As we rolled up our sleeves to begin, I began to think of ways I could accomplish this creatively, economically, and without becoming too overwhelmed. I began with "who, what, when, where and why" and you wouldn't believe what thoughts and ideas easily came to mind.

Wayne's mom is extremely thrifty. I knew I was going to have to use things that were always in the house (like the blue and white dishes) and ease my compulsive need for a certain type of presentation (this has to match that, and that has to match this and it all has to be hand/home made), while sticking to a reasonable budget...Let me rephrase that...The cost had to be cheap, cheap, cheap! So, "who"?...Wayne's frugal Mom and lots of hungry people. "What"?...Birthday party/reunion (so, it had to be very special). "When"?...Summertime, heat, near 4th of July, and right in the height of our business time. "Where"...Cape Cod, beach, sand, etc. "Why"? Because we love each other and sometimes you just have to stop your busy lives and make the people you love feel special!

Even though we all pitched in and contributed for the 5 days full of meals and activities, Wayne and I were to host the "Lobster Reunion/Birthday Party". Below are some sample pictures of what and how I came up with the place settings:


Luckily, I had a large amount of these plates. I decided to go with summertime/traditional "lobster dinner" colors not only because of the time of year or the fact that we had the plates, but also because of a yard sale I had been to that offered up large amounts of coordinating fabrics, for cheap prices. Also, Lobster is a "sit down" dinner and can be quite messy, so I chose to help the environment and try to save on the use of paper products.


I made cloth napkins by simply ripping 2 of the coordinating fabrics into squares (View sample in my previous post to see the other napkin fabric. I set the table every-other). I made the napkin rings by cutting toilet paper roll centers into 4 pieces, wrapping them with torn, frayed strips of fabric and gluing them to the roll. I then ripped other fabric into strips and made bows, glued the bows onto the ring and glued an antique button on each bow center! After that, I folded and fanned the napkin, slipped the ring over it, slid the utensils and a plastic lobster bib into the center and we were good to go!


Close up of wrapping.


Yet another close up!


I used some fun paper napkins for the horsdeovres' table. I got these cement birds out of Wayne's dollar box outside his shop. They helped me keep the napkins from blowing away!


I found these cute tin pails at Christmas Tree Shops and put extra utensils in them. And shown in front of the pails, is a sample of the favors I made for each person.


People love to take home a little memento. This was so simple, but meant so much. I got little clay pots for each and filled them with a little red candle. I wrapped the rim with a fabric strip (to match the napkin rings), and added the bow and button. With a blue paint pen, I wrote: "Marge's 87th" on the back and "Family 2010" on the front. I filled each small cellophane bag with red and white confetti mixed with peppermint Cape Cod taffy. (Their wrappers were red, white and blue!)


All tied up with raffia and ready to go!


Here's a place setting for yet another party in another season. So you see, I haven't wasted anything. I have all my napkins laundered, my rings stored, and I am all set to entertain again, but perhaps with a different theme!


I made these arrangements for two of the food tables. Once again, Wayne's dollar bin came in handy. Isn't this aluminum tea pot cute with the geraniums and vinca? When Wayne saw the pots he said, "Hey! You owe me $2.00!" I said, "Well, I spent the rest of my money at the grocery, so I will have to pay you in grilled chicken!"


The eating tables had these sand candles on them. I used the dessert size blue and white plate as a candle dish and put the taffy and confetti around them. If you would like to make some of these candles for one of your parties, please refer to my previous post, "Come Play In the Sand", for the basic sand candle recipe.


Pictured here are the supplies for making the sand candles with dyed sand. I used 1/4 tsp. of tempera paint, per cup of sand. I added just enough water to spread and whisk the color throughout the sand.


I spread the sand on a cookie sheet to let it dry and later use it to roll the candles on.


Keep a good thought while waiting for the sand to dry! When it does, break it up fine and you are ready to roll!


When I post again, I will show you how to make the cushion covers! In the meanwhile, be happy!


Pieces of Dreams